這是 Google I/O 2017 Day 2 (5/18) 一場關於 Android TDD 實務的演說,也是唯一跟 Android 自動化測試比較有關的分享。
整場演說以測試金字塔 (Testing Pyramid) 與 TDD workflow 為主軸,從 large end-to-end (E2E)/UI test 開始驅動 small unit test,再回頭用 hermetic testing 的思維導出中間的 medium integration test。
過程中公佈下一版 Android Testing Support Library (ATSL) 將會有 Android Test Orchestrator 與 Multiprocess Espresso,分別用來消除 large E2E test 間的交互影響、解決 UI 可能執行在多個 process 的問題。
其間最讓人意外的是 Robolectric 似乎開始在 Google 內部受到重視,雖然官方尚未宣稱支持這個專案,但從內部許多專案已經採用、Android CTS 相容性測試已達 70% 看來,正式成為 ATSL 的一員是可以期待的?
文中摻雜了許多個人的想法,建議先看過官方的影片,有不同的觀點也歡迎留言討論;圖片均來自影片的截圖,若有侵權請告知做調整。
Mobile Ninjas
在 Google 內部有個稱做 Mobile Ninjas 的團隊,由一群對軟體測試有熱情的人所組成。
四位講者都是 Mobile Ninjas 的成員,大家熟知的 ATSL - 包括 AndroidJUnitRunner (AJUR)、JUnit test rule、Espresso 都是這個團隊在負責,有趣的是他們也正積極參與 Robolectric 的開發。
就我所知,Espresso 第一次公開是在 GTAC 2013: Espresso: Fresh Start to Android UI Testing,當時的講者 Valera Zakharov 主導過 Espresso 與 ATSL 的開發,不過他已經離開 Google 加入 Slack,成為 Mobile Ninjas 的校友。
測試金字塔
測試金字塔 (Testing Pyramid) 由 unit tests、integration tests、E2E tests 組成,分別對應 ATSL 的 @SmallTest、@MediumTest 與 @LargeTest。
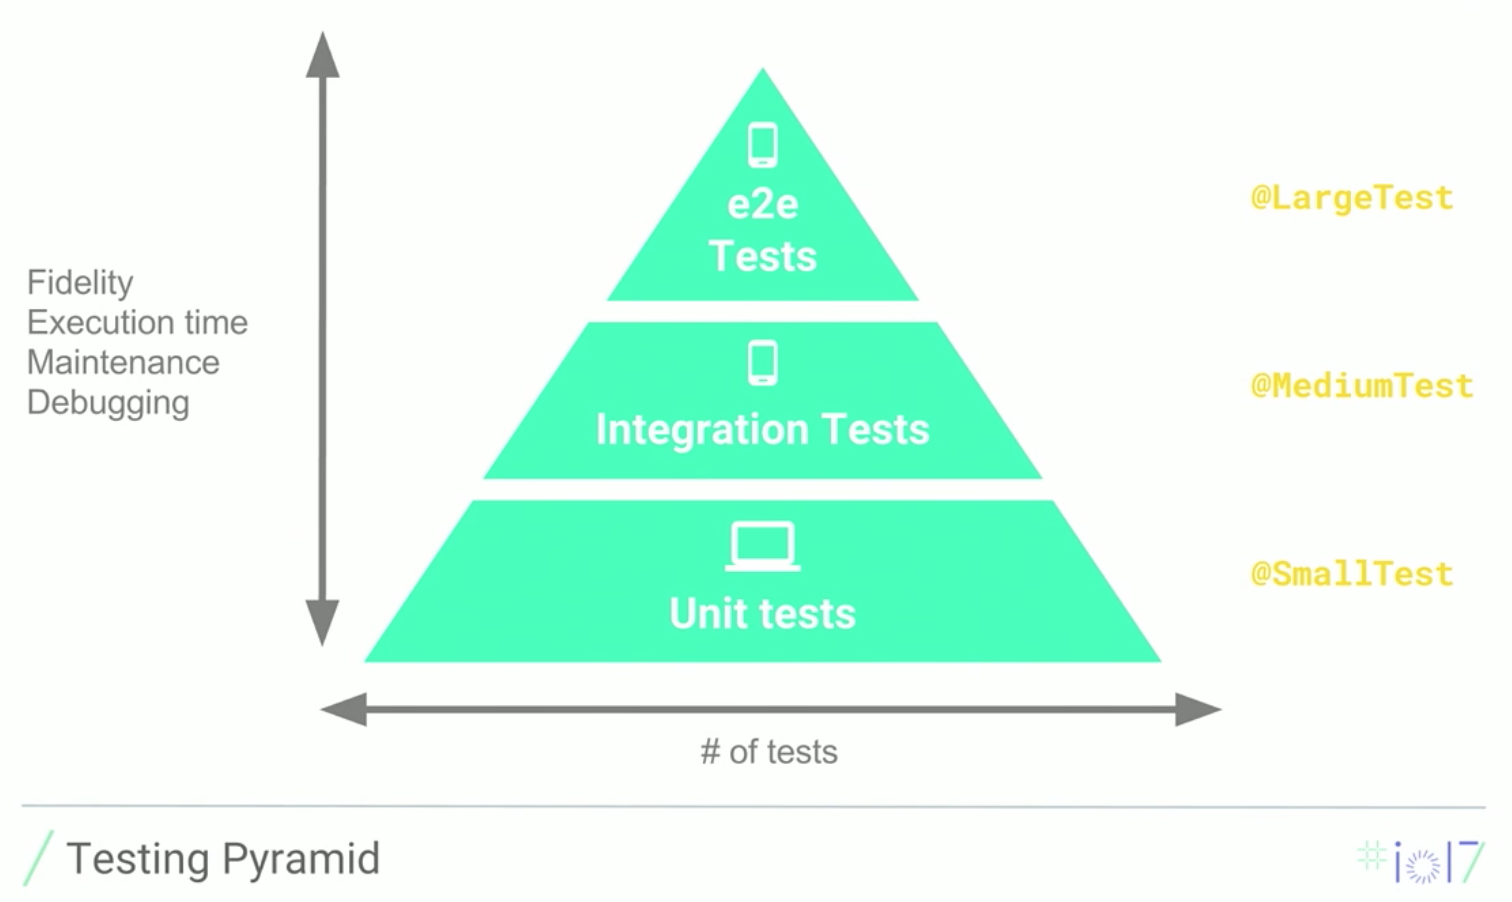
最底層的 unit test 執行在主機的 JVM 上,也就是 local unit test - 速度極快、專注在單一面向 (highly focused),這一層的 trade-off 是 fidelity (忠實),因為過程中會用到許多 mock/fake object。
往上是 integration 與 E2E test,因為重點是 fidelity,所以要執行在 device/emulator 上,也就是 instrumented test - 速度較慢、涉及的面向較廣 (less focused),這一層的 trade-off 則是測試速度。
19:26 Testing is about tradeoffs.
為了在測試速度與 fidelity 間取得平衡,實務上會混用 local unit test 與 instrumented test,當然在數量上 local unit test 會比 instrumented test 多很多。Google 內部的專家則建議 small、medium、large test 的比例可以維持在 70:20:10。
03:15 There’s no single layer in this testing pyramid that can suffice so what you need to do is to BLEND in tests at different tier leveraging the strengths of one category to weight off the trade-off in another.
There’s no real hard and fast rule here, but Google’s own internal testing experts recommend a 70-20-10 rule of thumb the ratio between small, medium and large tests.
或許是為了避免失焦,這場演說完全沒有提到如何減少對 instrumented test 的依賴,例如套用 MVP 或 MVVM 架構,讓大部份的邏輯可以用 local unit test 進行測試,倒是另一場演說 Architecture Components - Introduction 裡有提到類似的概念:
07:51 Third, we are going to introduce a lightweight ViewModel, which is all of our effort to TAKE OUT THAT CODE OUTSIDE OF YOUR ACTIVITIES AND FRAGMENTS, and put it somewhere else where you can easily test it.
32:25 Now, people say UI testing is hard. UI testing is – yes, it’s harder. But it’s usually hard because you put all of your code into that activity. Now we said, put most of it into the ViewModel, and you know that UI only talks to the ViewModel, so you can get rid of the other two. You only need to create a fake ViewModel to test your UI. Testing your UI becomes super, super easy with Espresso.
TDD Workflow
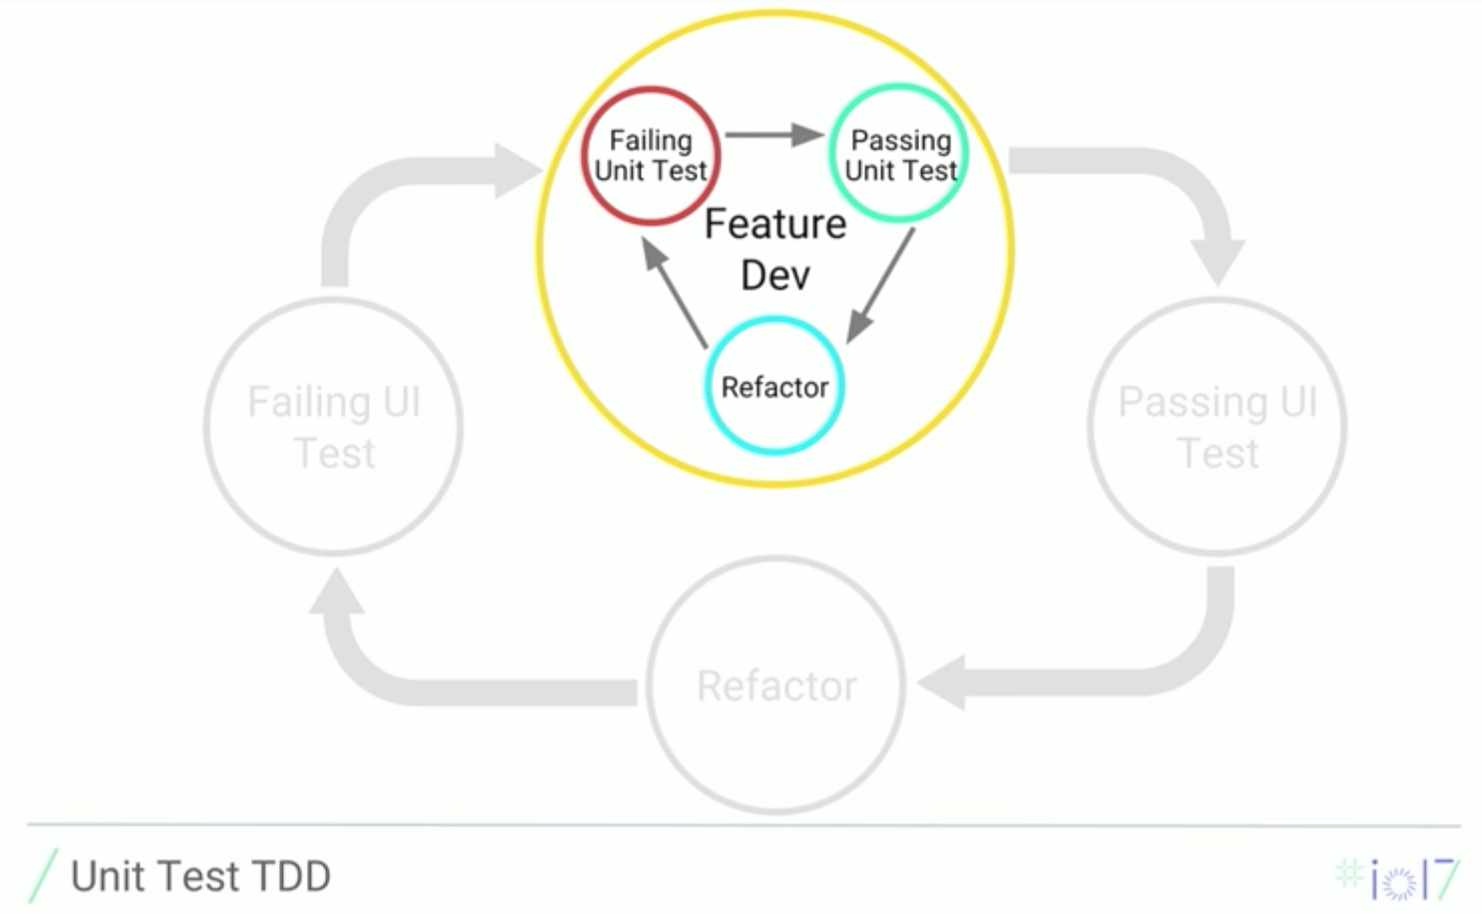
TDD workflow 由內外圈兩個迭代 (iteration) 組成,外圈的迭代用 UI test 來驅動功能開發 (feature development),中間更小的迭代則用 unit test 來驅動該項功能背後數個小單元的開發。
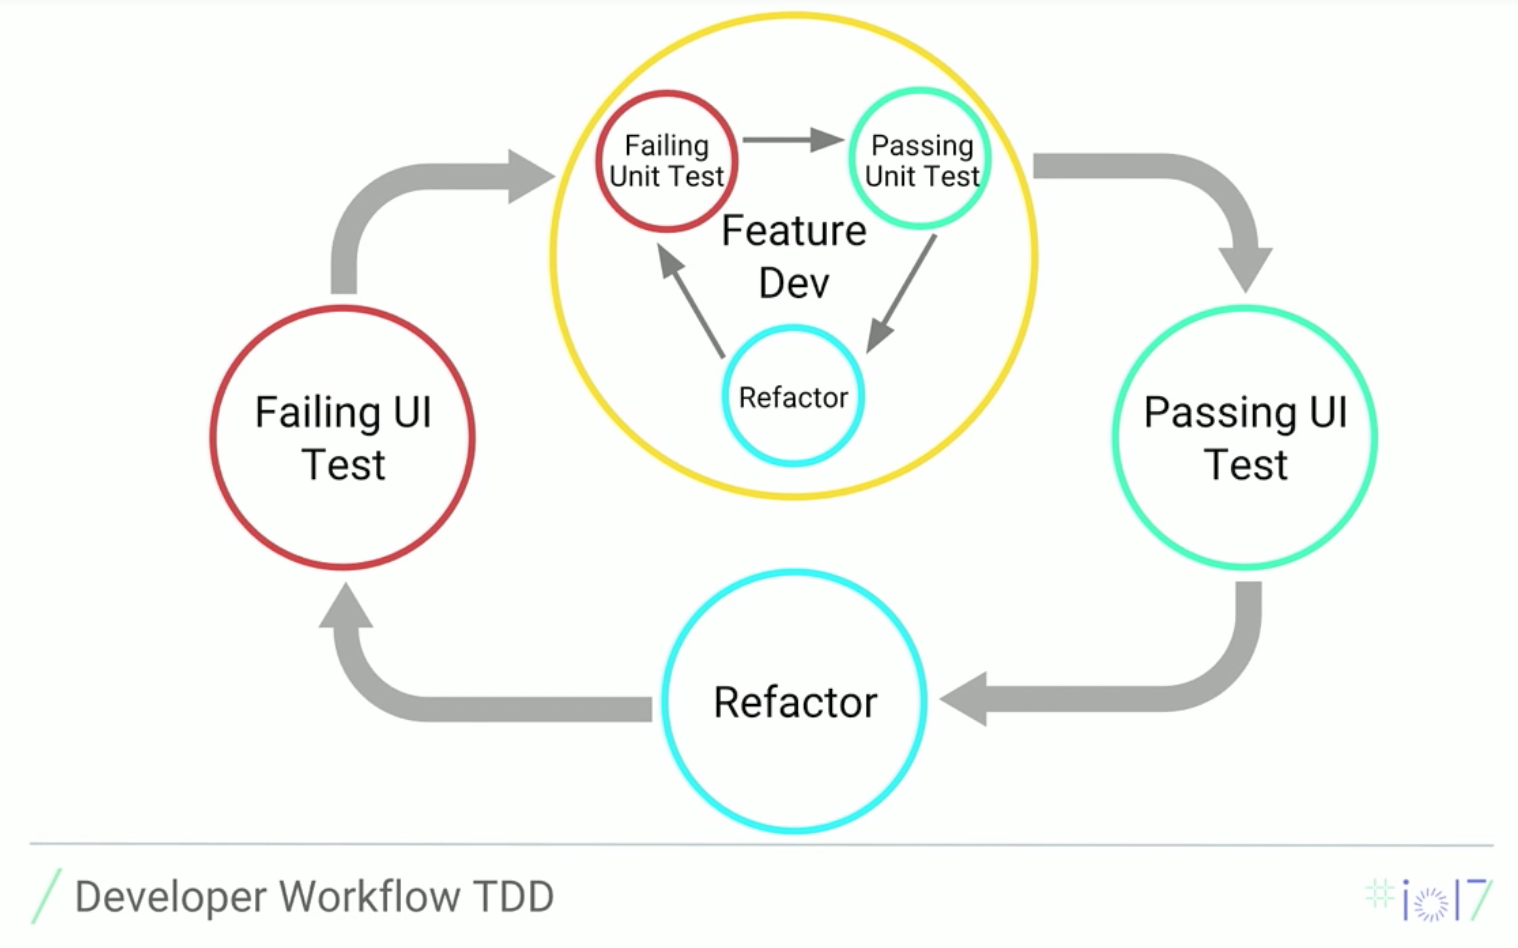
同 TDD 的真言 (mantra) - Red-Green-Refactor,內外圈的迭代都是先寫 test code 再寫 production code (足以通過測試即可,不多也不少),待測試通過後再進行重構 (refactor),形成一個循環。
04:05 We like test-driven development because it makes you to think about the design of your application UP FRONT. It gives you consideration to APIs and the structure of your code. With test-driven development, you’re also going to be writing LESS code because you only write the code necessary to satisfy your tests.
Larget E2E / UI Test
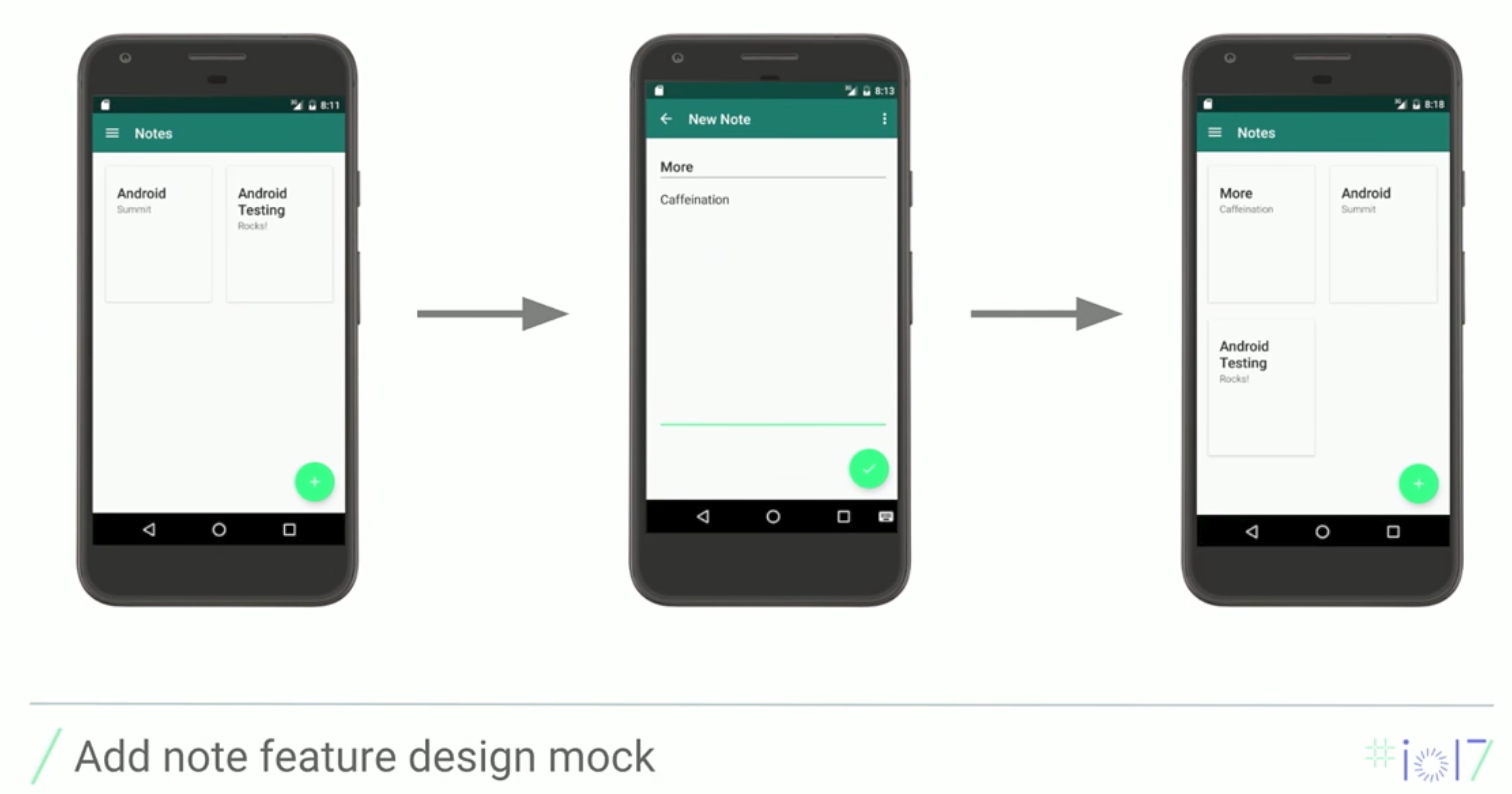
整場演說都用類似於 Android Testing Codelab 的記事 app 做為範例,並專注在 “新增一則筆記” 這項功能,說明如何搭配不同層級的 test,來驅動這項功能的開發。
首先從 TDD workflow 外圈的迭代開始,把焦點放在測試金字塔的最上層,用 Espresso 實作 UI test - NotesScreenTest.java:
|
|
這個 test 會橫跨多個 activity,從筆記清單的畫面 (NotesListActivity) 開始,按右下角的 + 鈕 (R.id.add_note) 進到新增筆記的畫面 (AddNoteActivity),輸入 title (R.id.title) 與 description (R.id.description) 後,按右下角的 ✓ (R.id.add_note) 儲存筆記後回到第一個畫面,最後檢查新增的筆記有出現在畫面上。
此時執行這個 test 會失敗,因為尚未寫任何的 production code,不過為了讓 test code 可以成功編譯,至少得建立空的 activity、在 XML layout file 裡定義 test code 會用到的 resource ID 等。
06:25 Now remember, with test-driven development, we’ll not implement code just yet. All we have to do is implement enough of the application to satisfy the specification of our tests. So an empty activity, and just the resources that we need, will suffice. Once we have that, we can run our test and we’ll see it’ll fail.
雖然 UI testing 要不要做為 TDD 的一環是有爭議的,不過因為 Espresso 的 API 極為簡單,會讓這件事變得可行。
27:20 And because this API is so simple, it’s the perfect tool for fast TDD prototyping of UI tests.
Small / Unit Test
為了讓 UI test 通過,接著把焦點移往測試金字塔的下層 - 該項功能背後組成的小單元,進到 TDD workflow 內圈的迭代,這個部份則由 unit test 來驅動。
先列舉好的 unit test 應該要有幾個特點:
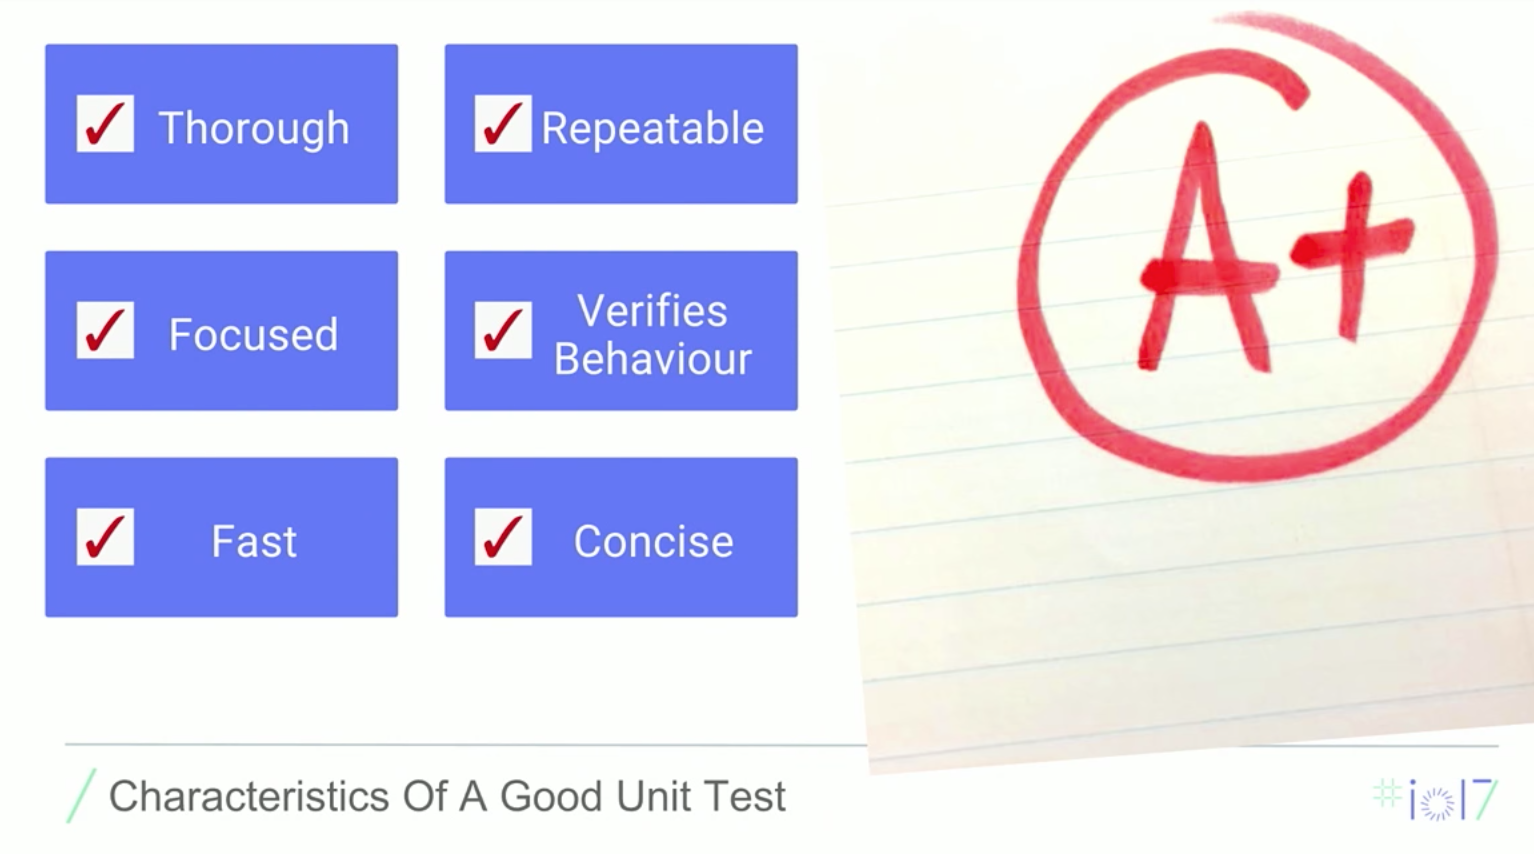
- Thorough - 除了 happy path 外,也要考量各種例外狀況、邊界值測試 (boundary testing) 等,也因此 unit test 的數量會很多。
- Repeatable - 每次的測試結果都要一樣 (可預期的),要避免跟外部的伺服器、當下的時間等產生相依,否則會讓 unit test 同樣遭遇 flakiness。
- Focused - 每個 test 只專注在單一個面向,失敗時才能很快找到有問題的地方。
- Verifies Behavior - 避免對實作做太多假設,測試 behavior 才不會因實作細節改變就要調整 test code。
- Fast - 因為數量很多,所以執行速度一定要快,否則會讓人不太想寫測試、進行重構。
- Concise - Test code 會隨著 production code 演進,保持簡潔就會是最好的文件 (documentation)。
AddNoteActivity 的 unit test,理想上會像這個樣子:
|
|
講者習慣把 arrange, action 跟 assertion 明確切分開來,這樣可以提高 test code 的可讀性。相對於前面的 NotesScreenTest (@LargeTest),這裡的 AddNoteActivityTest (@SmallTest) 只測單一個 activity,確認在 AddNoteActivity 按下 “Add Note” 時,筆記會被存起來。
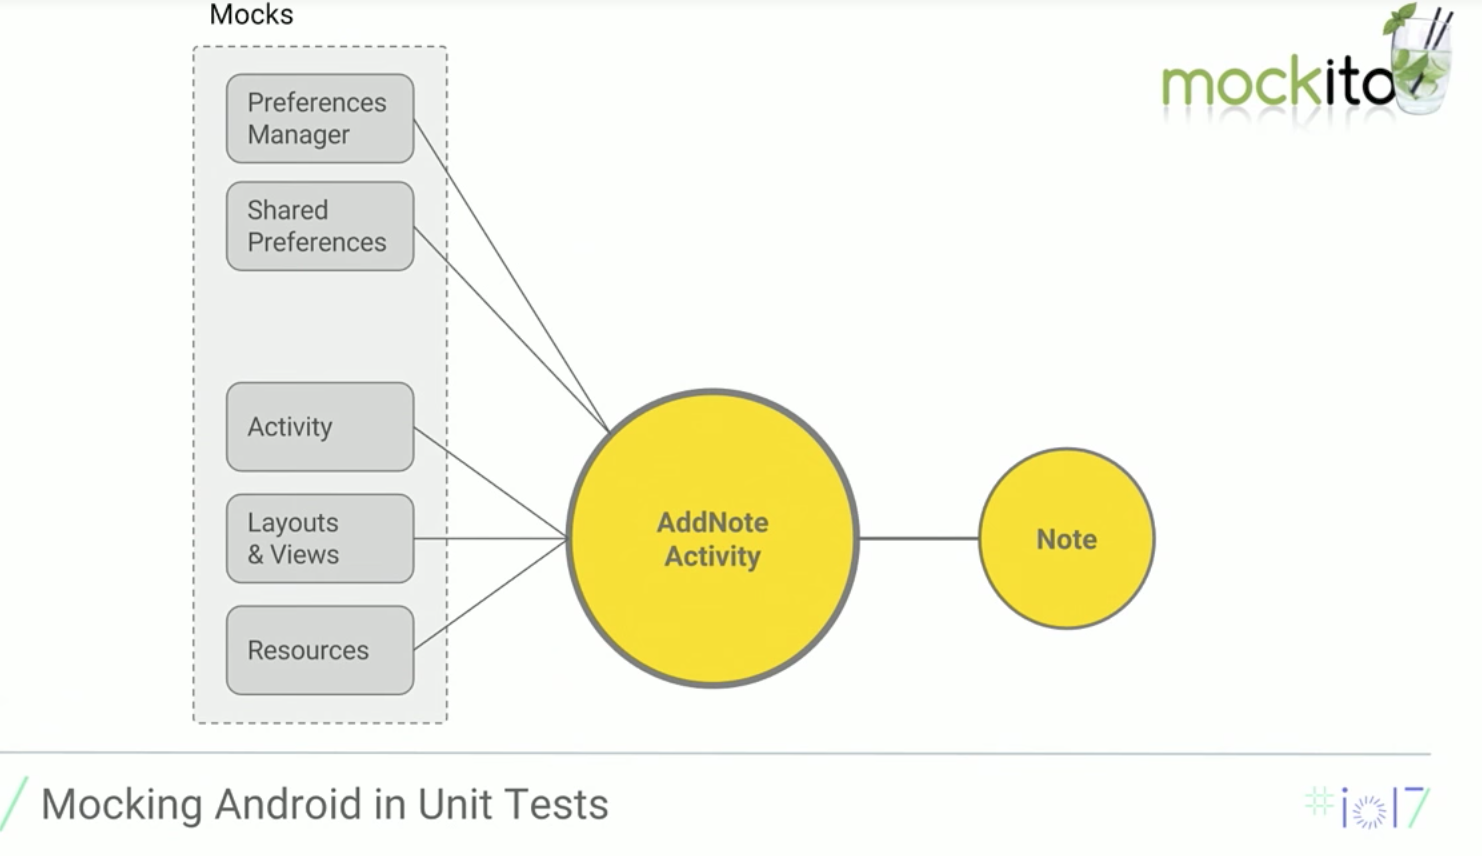
一開始先用 Mockito 來寫 unit test,利用 mock object (搭配 mockable android.jar) 把 Android framework 的相依性隔離 (isolate) 開來。
|
|
結果會有很高比例的 test code 都在安排 Android framework 該有的反應 - 對測試對象 AddNoteActivity 做 spying、為了通過 test 而對 Android framework 做了過多的 stubbing、因為 Android framework 本身用了一堆 static method,逼得我們必須額外用 PowerMock 才能處理它 …
10:40 Up until now with the Android platform, you’re writing your unit tests using the mockable jar conjunction with a mocking library, such as Mockito.
10:58 Wow. That’s a lot of code. OK. So because we have so many interactions with the Android framework, we’re going to need to provide stubbing behavior for all of them in order just to satisfy the execution path of our test. And furthermore, because Android uses a lot of static methods, we’re forced to introduce a second mocking library, PowerMock, that will handle this special case for us.
顯然用 Mockito 來處理 Android framework 的相依性並不那麼合適,況且這也違反了 Don’t mock type you don’t owk 的原則。
過程中有討論到,將筆記儲存在雲端 cloud storage 是可預見的需求,或許可以提出一層 note repository 做抽象化 (abstraction)?雖然 TDD 促使我們預先思考設計,但是從簡單的 test 開始也是 TDD 很重要的一點,所以要抗拒過度設計的誘惑 (resist the temptation),也因此上面的 test 雖然命名為 shouldSaveNoteToRepository(),但卻沒有用到 repository。
09:19 It’s conceivable that, as our application evolves, so did our requirement. And perhaps our storage requirements evolve to persist the notes onto cloud storage and we have to build some kind of a synchronization mechanism for local storage for the offline use case.
And in these cases, we see opportunities for abstraction. We might, in this example, see that we can extract a notes repository. However, one of the key aspects of test-driven development is that we only start by writing the simplest case first, and then we iterate. So we’re going to resist the temptation to do this early.
Robolectric
由於 Android framework 的相依性用 Mockito 處理起來會很麻煩,所以順勢把 Google 正積極參與開發的 Robolectric 帶出來,由原作者 Christian Williams 現身說法。
確實 Robolectric 是早期匆忙拼凑的 (scrappy) 的方案,因為受不了把測試送到 device/emulator 很花時間,在去年 Christian 加入 Google 之前 (成為 Tools and Infrastructure 的一員),Jonathan 已經在為 Google 內部的 test suite 改善 Robolectric,之後便合力貢獻回 open source project。
Christian 表示,雖然 Robolectric 仍然不是官方 Android Testing 的一部份,但如果使用正確的話,將會是 testing strategy 裡很有用的一塊。
Robolectric 用在 local unit test,提供 Android sandbox 並執行真正的 SDK code (simulates the Android SDK for unit tests),在 test code 中可以存取 activity、layout、view、resource 等,至於在 Android framework 裡有些相依於 native code、hardware、external system service 的部份,Robolectric 則用 shadows (一種 test double) 來處理,也就是替換成適合 unit testing 的實作 (alternative implementation)。
用 Robolectric 改寫前面 Mockito + mockable android.jar 的 test code,會變得很簡潔:
|
|
(這裡假設已經實作 note respository 的機制,所以才會有 Injector.getNotesRepository() 的用法出現)
Robolectric 會根據 manifest 設置 application,例如 Robolectric.setupActivity(AddNoteActivity.class) 會讓 activity 走過適當的 lifecycle 來到正確的 state (指 onResume()),跟 Espresso 不同的是,這裡都直接操作 view - 用 Activity.findViewById() 找 view、用 View.performClick() 模擬使用者的動作 (其實是呼叫 OnClickListener)。
Shadow 除了為 unit testing 提供替換的實作,也為某些 Android class 提供 extended testing API,可以用來詢問內部狀態 (internal state) 或是改變它的行為。例如 shadowOf(application).getNextStartedActivity() 就是在問 application 測試過程中是否有啟動 intent,這裡就可以用來檢查儲存筆記後是否回到 NotesListActivity。
(15:58 的投影片寫著 shadowOf(application).getStartedIntent(),這應該是誤植,因為 Robolectric API 從來都沒出現過 ShadowApplication.getStartedIntent())
有了 failing unit test,接下來 production code 反而是比較簡單的部份 - 只寫可以通過 test 的程式,不多也不少:
|
|
16:47 In the spirit of TDD, we’re only going to write exactly as much as is needed to make the test pass. No more, no speculative codeing.
Robolectric 也可以模擬各種 device condition,包括 SDK、螢幕大小/轉向 (qualifier) 等,例如:
|
|
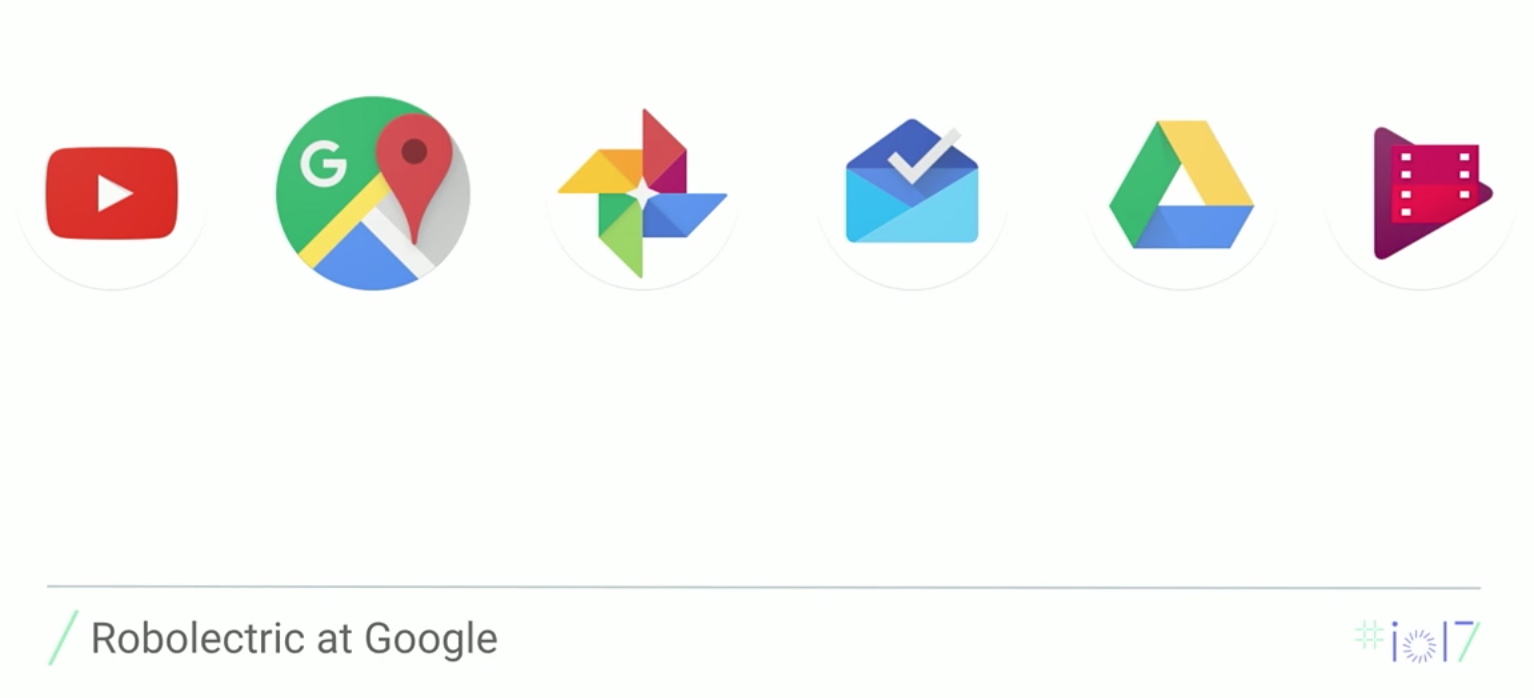
在 Google 內部也有不少專案採用 Robolectric,包括 YouTube、Google Maps、Photos、Inbox、Google Drive、Google Play Movies & TV 等,所以 Robolectric 是已經經過試煉 (battle-tested)。
目前 Robolectric 已開始進行 Android CTS 相容性測試,進度已達 70%;猜想做這項測試跟 shadow 要模擬 hardware、external service、device condition 有關?
為了讓 Robolectric 方便與 Android tool chain 整合,目前已支援 Android Studio、Gradle,另外與 Bazel (Google 自己的 build system) 的整合也在進行中。
最後 Christian 提醒,Robolectric 並非 one-size-fits-all 的方案,它很快,但它並非 100% 等同於 Android,所以應該審慎地 (judiciously) 使用它,涉及多個 activity 的測試不太算是 unit test,用 Espresso 就很合適,另外若涉及 multiple threads、synchronization 也不算是 unit test,都不適合用 Robolectric,尤其不要用 Robolectric 來測試與 Google Play 之類 service 間的互動,這需要更高層級的測試。
Android Test Orchestrator
假設已經寫了許多 unit test,接下來就可以寫些 integration test 來確保那些 unit 整合在一起也沒問題,尤其是與真實 Android 環境的互動,這一類的 test 通常被稱做 instrumented test。
要執行 instrumented test,首先用 adb install 安裝 app APK 與 test APK (內含 AndroidJUnitRunner、test case 與 manifest),再透過 am instrument 開始進行測試,app APK 與 test APK 會執行在同一個 process 裡。
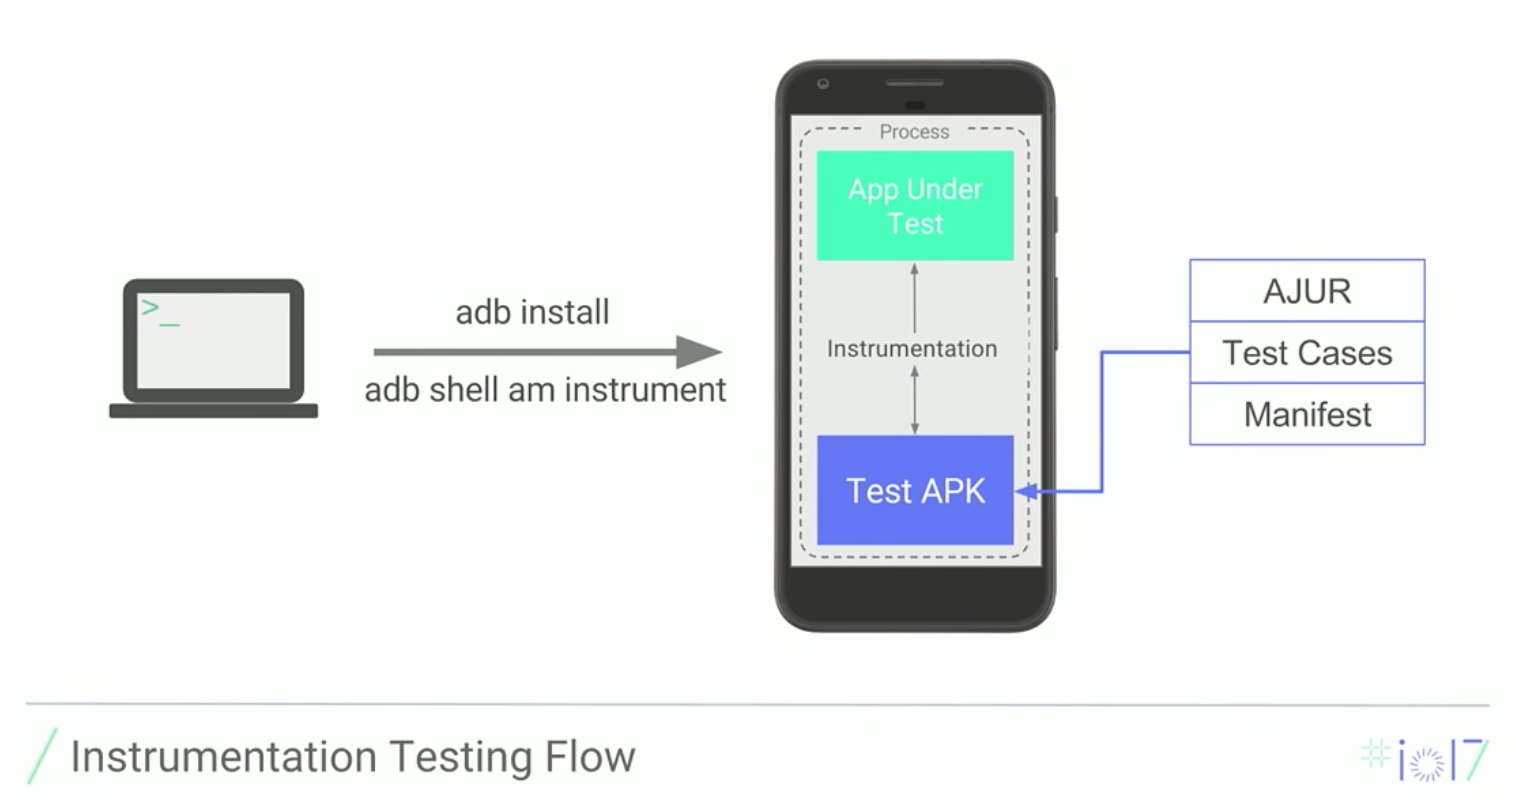
過程中整個 Android stack 的不同層級都參與其中,這類測試的好處是 high fidelity,但代價是 slow 與 flaky。Stephan Linzner 接著說明 instrumentation 原理、大量測試可能引發的問題,最後再提出 Google 的解決方案。
<instrumentation> 在 manifest 裡是頂層的 tag,這代表著它是 Android framework 很深層的一塊,能夠控制 activity 的 lifecycle。就這點而言,instrumentation 顯然是注入 test runner 的絕佳位置 (interception point),也之所以 AndroidJUnitRunner 就是個 instrumentation (繼承 android.app.Instrumentation)。
|
|
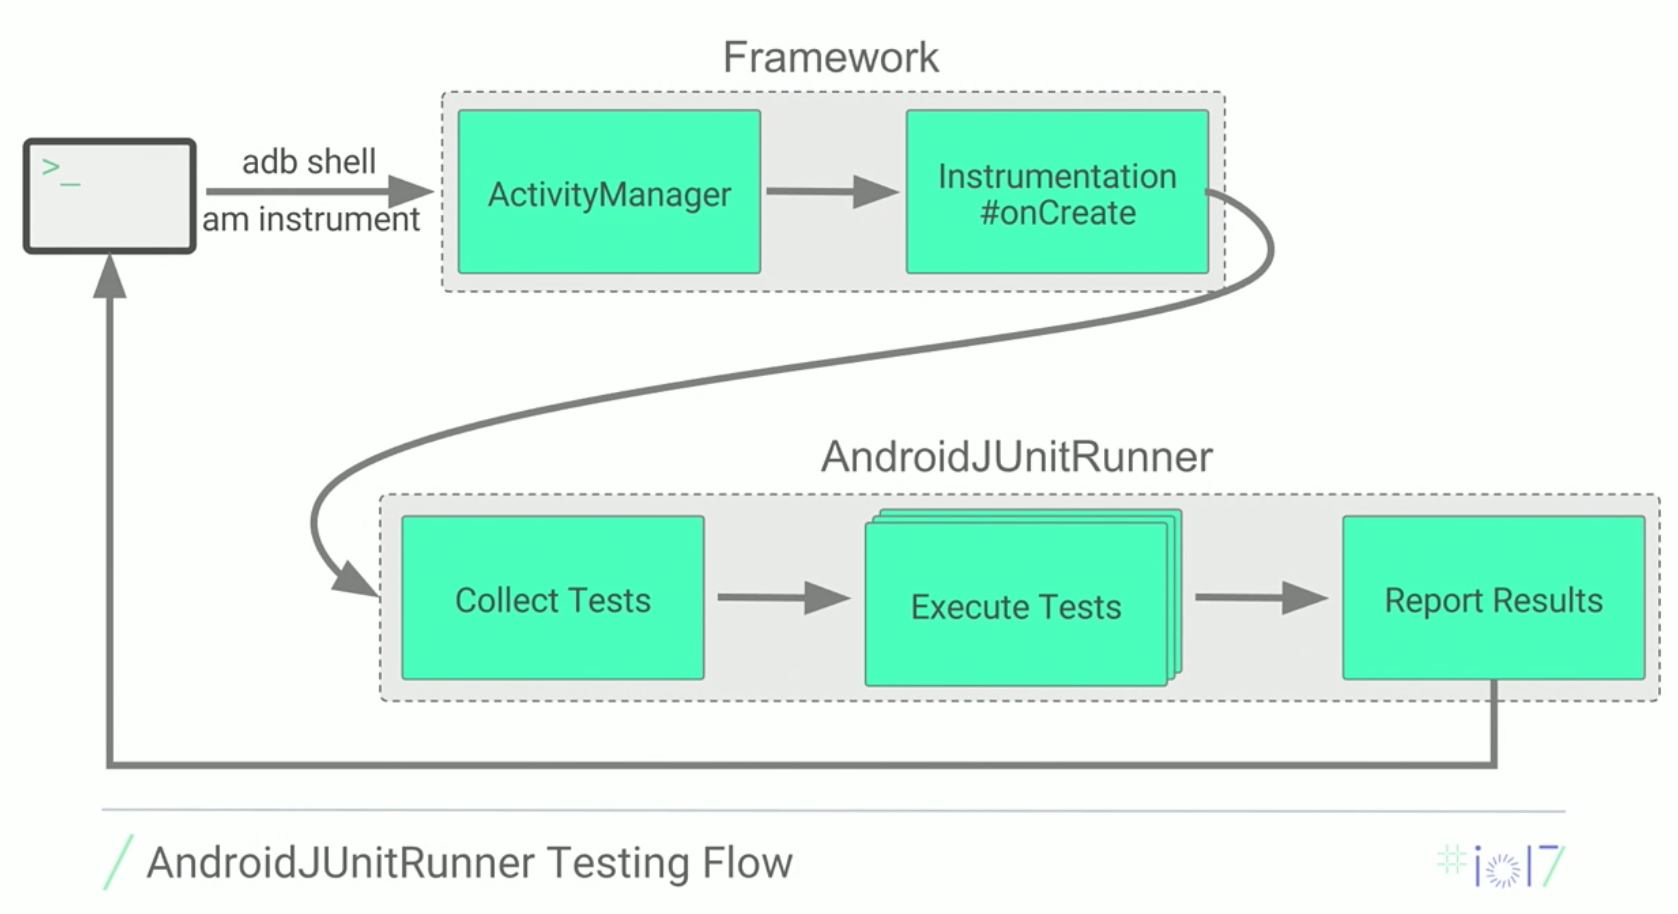
進一步來看 am instrument 背後發生的事,它會透過 activity manager 來啟動 instrumentation - 呼叫 instrumentation 的 onCreate(),也就是 AndroidJUnitRunner.onCreate(),接著 test runner 會蒐集符合條件的測試、逐一執行測試、最後統一回報測試結果。
由於 AndroidJUnitRunner 與受測的 app 執行在同一個 process,如果在一次 instrumentation invocation (am instrument) 裡執行多個 test,可能會引發一些問題:
- Shared State - 在 memory/disk 裡逐步累積 (build up) 的 state,可能導致沒理由的測試失敗或無法預期的狀況。
- Crashes - 因為上面 shared state 的關係,可能在未來的某個時間點突然造成 crash。更糟的是,因為整個 process 跟著結束,後續的 test 也就不會執行。
- Debugging - 一次執行大量的測試,
logcat的輸出會過於冗長,事後要從 log 找問題也不容易。
在 Google 內部,每天有無數個 instrumented test 要執行,所以 Google 自己也面臨相同的挑戰。針對這些問題,Google 採取一次 instrumentation invocation 只執行一個 test 的策略 - 用 Android Test Orchestrator 把所有的 instrumented test 隔離開來。概念上像是用個別的 am instrument 執行不同的 test:
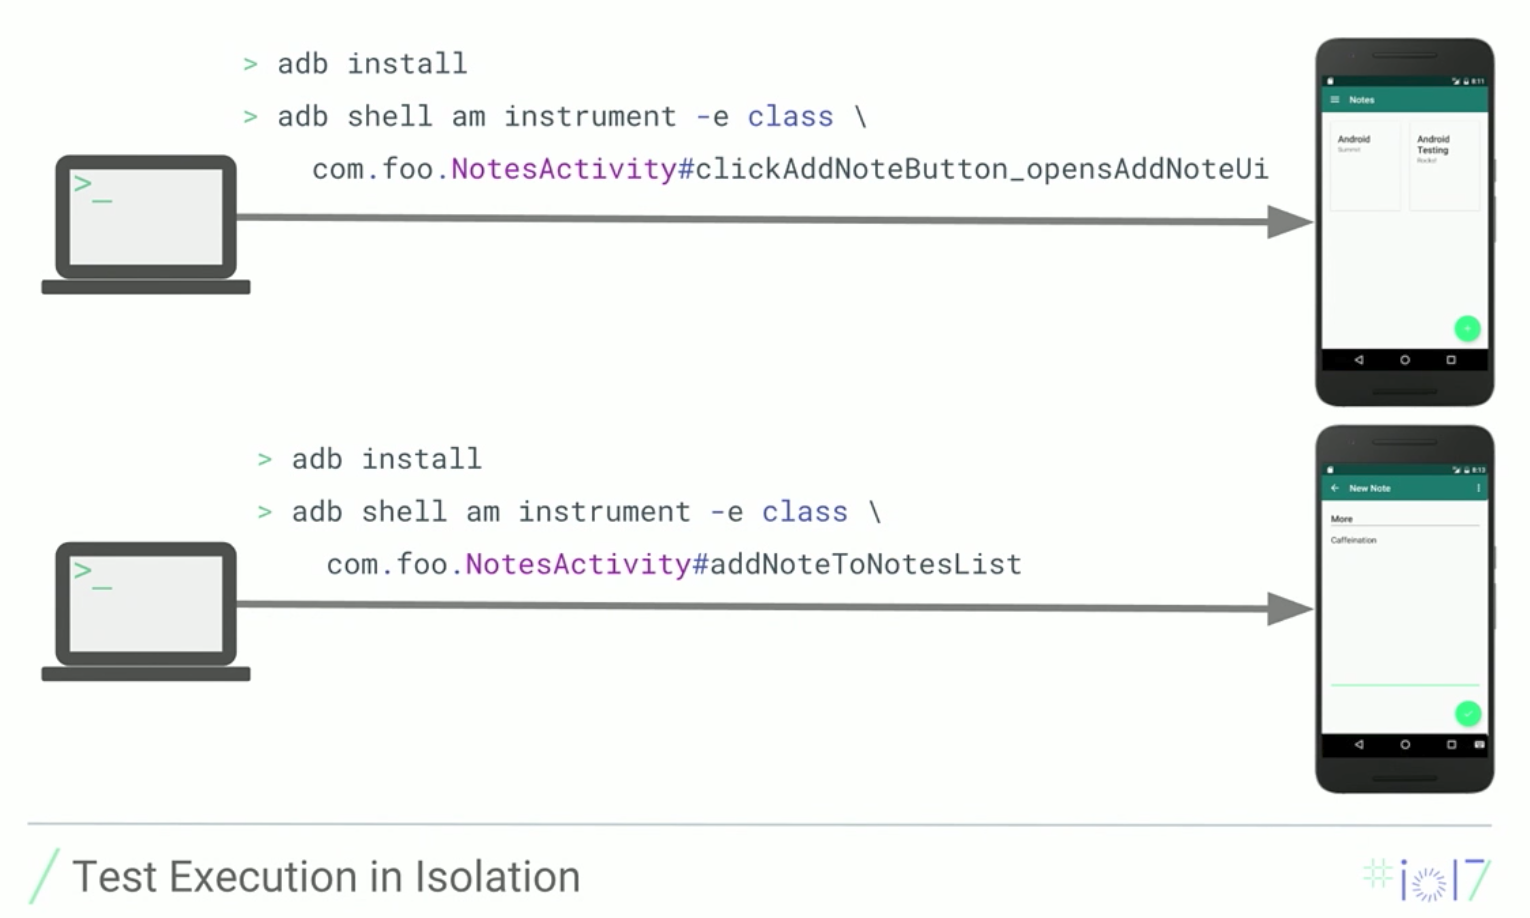
這也意謂著,在 instrumented test 裡,JUnit 4 的 @BeforeClass/@AfterClass 是不鼓勵使用的,效果等同於 @Before/@After。
這解決了上述 shared state、crashes、debugging 的問題,因為它會在每個 test 前做 pm clear (no shared state),若發生 crash 不會影響後續的 test (isolated crash),蒐集到的 debug information 也是針對特定的 test (isolated debugging)。
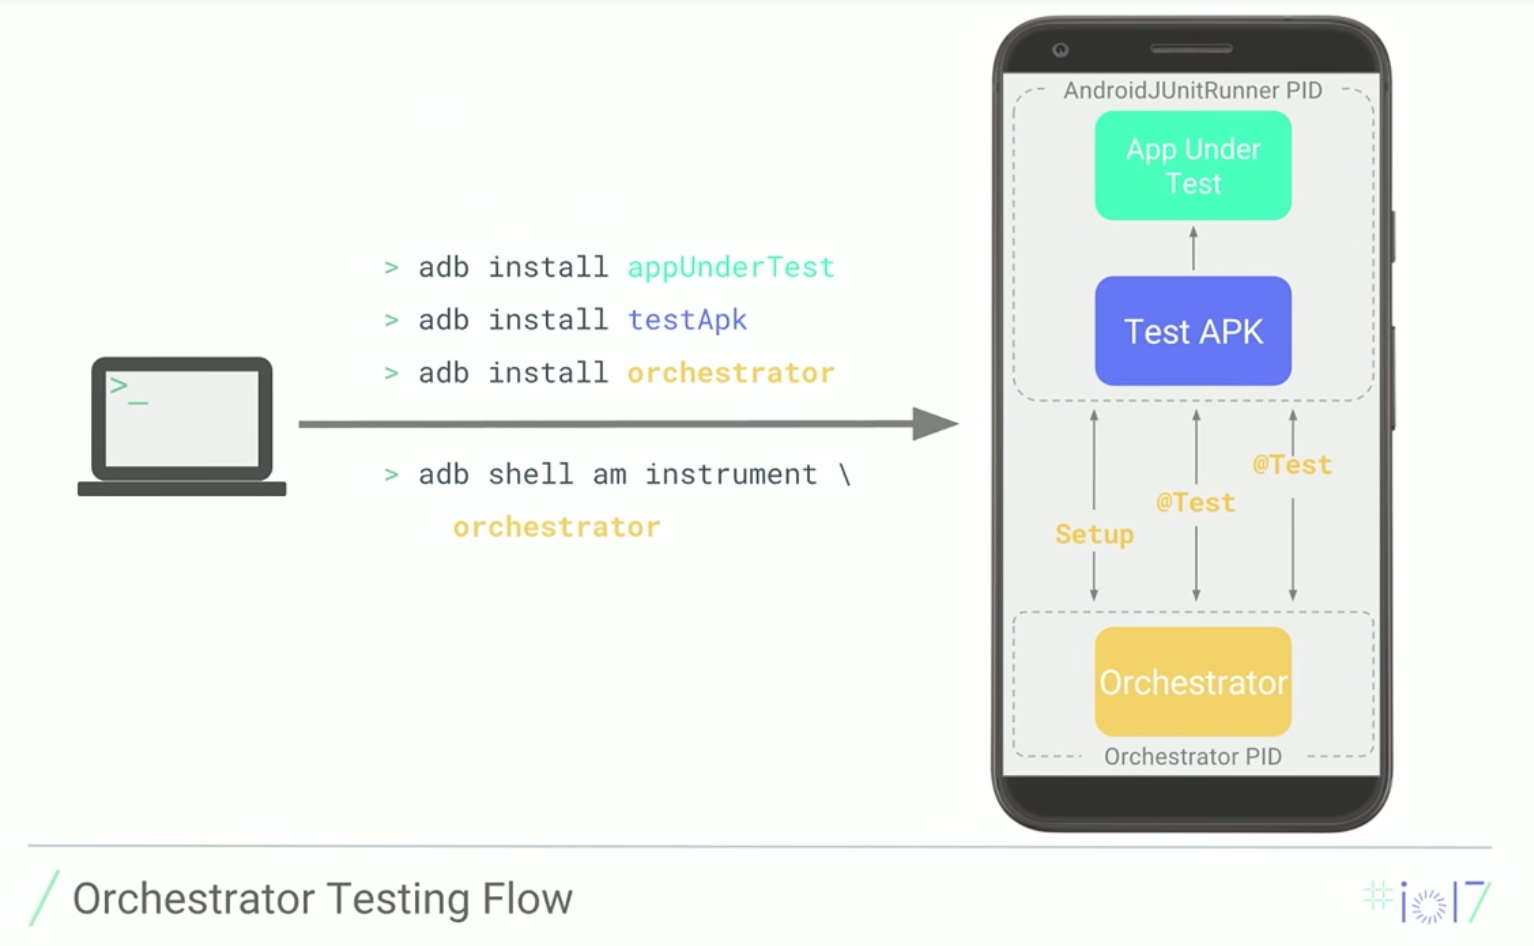
Android Test Orchestrator 在安裝完 app APK 與 test APK 後 (一樣執行在同一個 process),會加裝 orchestrator service APK (執行在另一個 process)、執行 orchestrator 的 intrumentation (adb shell am instrument orchestrator),然後執行在背景的 orchestrator 就會在 device 上用 AndroidJUnitRunner 蒐集測試、用個別的 instrumentation invocation 執行不同的 test。
預計下一版 ATSL 就會有 Andorid Test Orchestrator 可用,之後也會整合進 Android Studio、Gradle 與 Firebase Test Lab。
Synchronization Guarantees
Espresso API 因為簡單,很適合做 UI test 的 TDD prototyping。
|
|
其中最重要的是 synchronization guarantees - 確保 test code 在 app 進入 idle 狀態時,才會開始找 view,然後進行 UI 的操作或檢查。
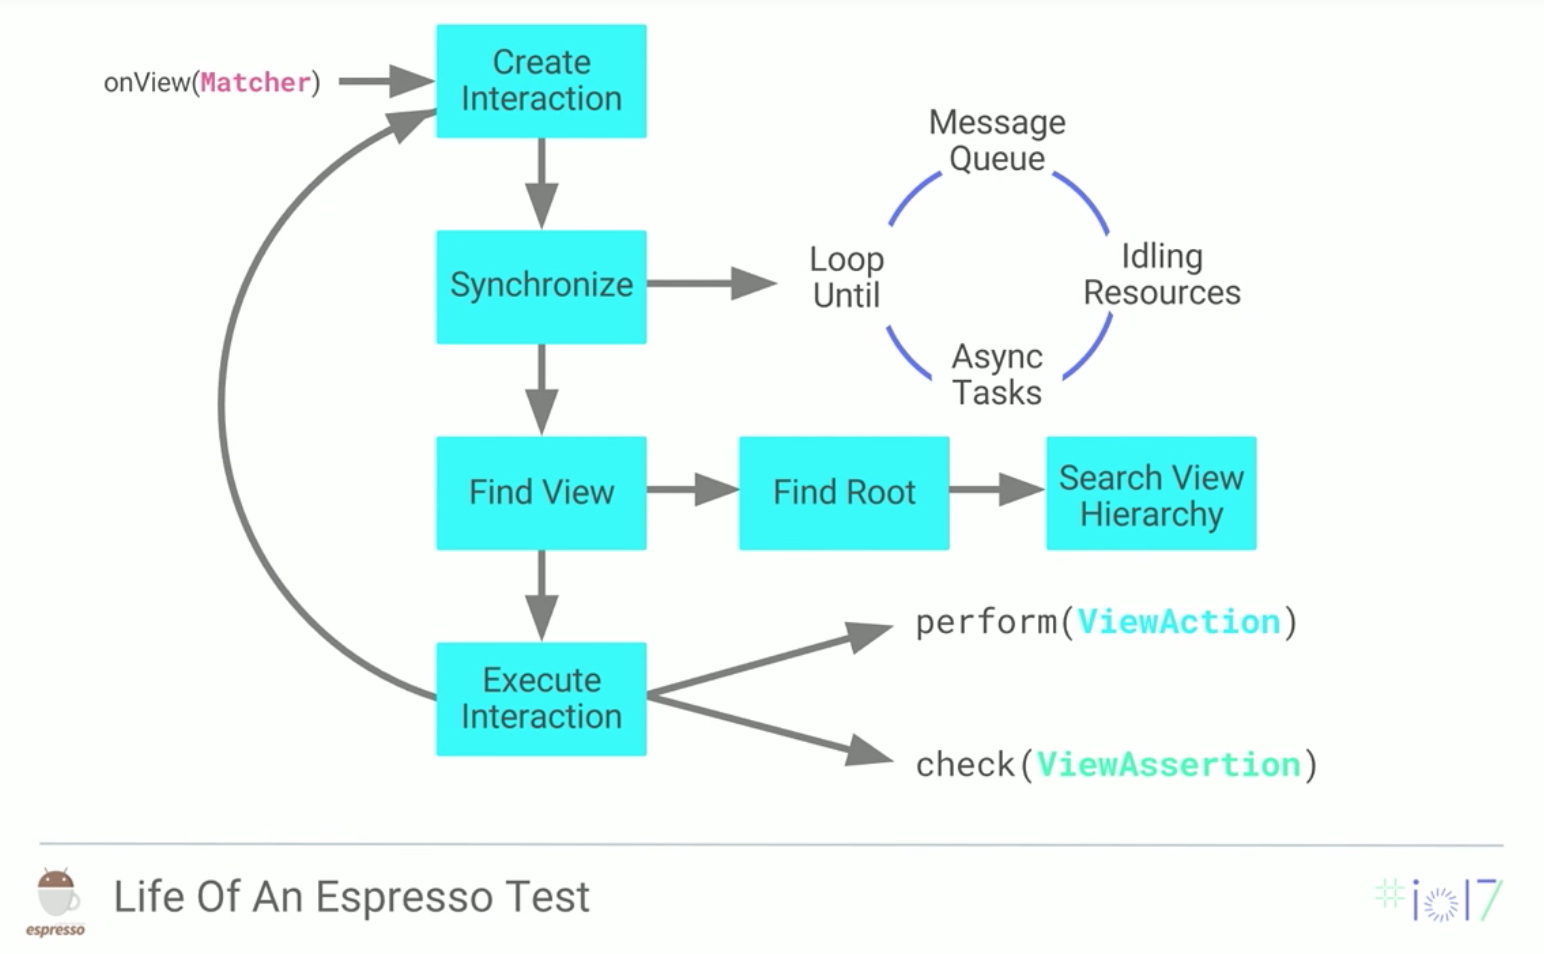
為了實現這項承諾,Espresso 會先等 message queue 在一段合理的時間內都沒有其他 message、所有 idling resource 都回報 idle、也沒有任何 AsyncTask 在執行時,才往下找 view,然後執行 view action,或是檢查 view assertion。其中 onView() 只是建立 view interaction,找 view 的動作是發生在確認 idle/stable 後,以及操作/檢查之前。
回顧一開始的 large E2E/UI test,其中 perform() 跟 check() 都是 synchronization guarantees 會作用的地方。
|
|
Medium / Integration Test
雖然橫跨多個 activity 的 large E2E test 可以覆蓋很多的 (production) code,但速度較慢、涉及的面向較廣,跟 TDD 快速的迭代並不是那麼搭,所以 medium-sized test 把焦點放在單一個 UI component (例如 view、fragment 或 activity),實現測試金字塔中間的 integration test。
32:22 So until now, we wrote a large end-to-end test that gives us a lot of confidence because it touches upon a lot of your code in your app, which is great for large end-to-end tests, but it’s not so great for an iterative test-driven development cycle.
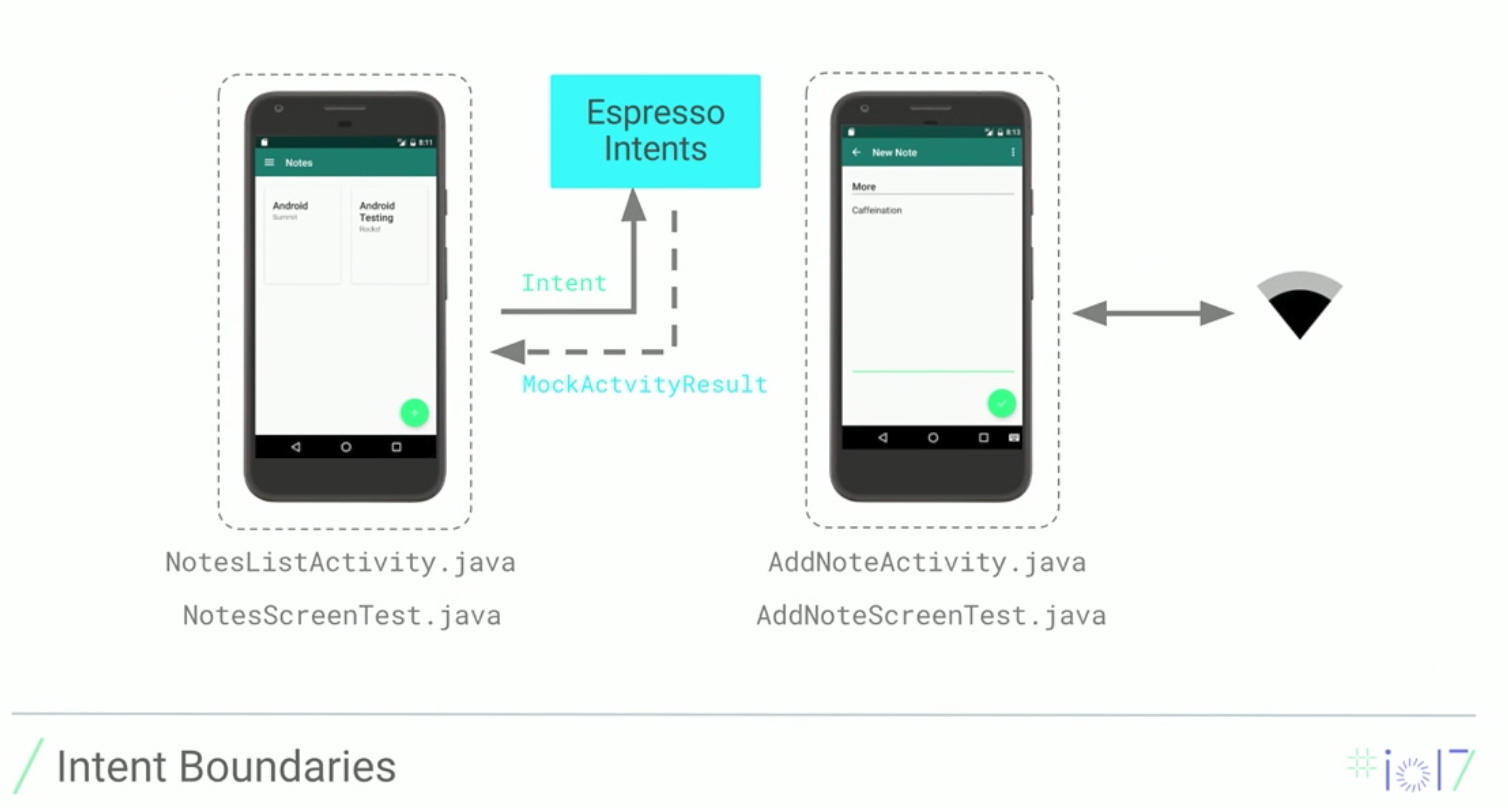
這裡以 activity/intent 做為分割的單位/界線,分別為每個 activity 寫不同的 isolated test。左側是筆記清單的畫面 (NotesListActivity),右側是新增筆記的畫面 (AddNoteActivity)。
(這裡假設之前提到的 cloud storage 已經納入實作,所以 large E2E test 會存取真正的 server)
就左側筆記清單的 activity 而言,可以透過 Espresso Intents 安排特定的 activity result,這樣就不用透過 AddNoteActivity 來新增筆記。
|
|
(或許是為了方便說明,所以講者才強調 NotesListActivity 與 AddNoteActivity 之間是透過 intent 在溝通,不過在這之前所有的範例都比較偏向由 AddNoteActivity 將新的筆記儲存到 repository,畫面切回 NotesListActivity 時再從 repository 讀取新的清單)
|
|
就右側新增筆記的 activity 而言,可以利用 hermetic repository 避開要直接存取 server 的問題,因為網路、server 都可能出狀況而影響到測試,而這些都不在控制範圍內。搭配 hermetic testing,不僅可以加快測試速度,也可以消除 flakiness。
35:02 So th main point here is that we no longer use the real server. Instead, we set up a hermetic repository. Now, there’s many different ways of you to do this, and this is just one way. So then you can use this hermetic repository in order to verify that your note is actually saved without ever leaving the context of your app or hitting the network.
|
|
從一個 large E2E test 衍生出兩個更快、更穩定的 medium integration test,雖然 E2E test 與 integration test 有著相同的 code coverage (嚴格來說 E2E test 會比較多),但這也就是為什麼測試金字塔中 integration test 的數量會比 E2E test 多的關係。
35:29 You have two smaller tests that are way more reliable and run much faster. But at the same time, you maintain the same amount of test coverage as your large end-to-end test. And this is why we want to have more of these smaller isolated tests compared to the large end-to-end tests we showed before.
Multiprocess Espresso
隨著 app 的演進,可能會有要把 Android component 執行在不同 process 的需求,若是遇到某些 UI component 執行在不同的 process,在 Android O 之前是無法用 Espresso 測試的。
|
|
雖然 Android O 的 <instrument> 開始支援 android:targetProcess 這個 attribute,但目前的 Espresso 無法支援跨多個 process 的測試,甚至不知道有另一個 process 的存在,所以無法承諾 synchronization guarantees。
目前 Google 自己就有遇到這樣的問題,所以提出 Multiprocess Espresso,不需要改變寫法,Espresso 就會自動協調多個 process,確保 synchronization guarantees。
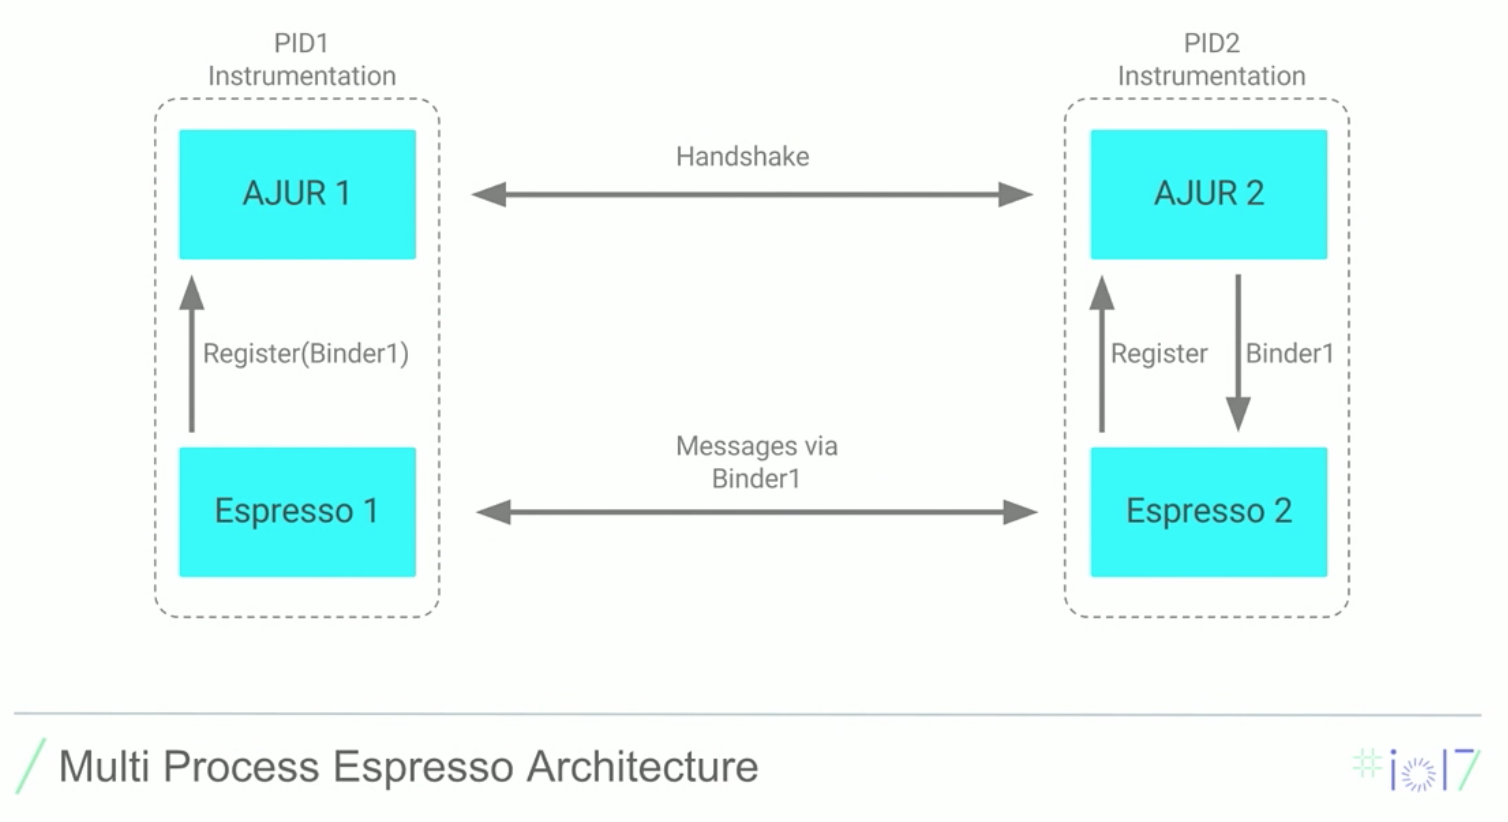
這項功能也將加入下一版的 ATSL。
結論
這個場次說明了如何將不同的測試工具 - ATSL、Espresso、Robolectric 應用在測試金字塔中不同的層級。想瞭解更多關於 Android Testing,可以善加利用下面這些資源:
- Android Testing Codelab
- googlesamples/android-testing - GitHub
- Testing Apps on Android | Android Developers
Happy Testing :)